In this article, I will share effective self study techniques you can use to get a 700+ score on the GMAT. These GMAT preparation self study techniques will help you capture, organize, and review information so that you can remember more of what you learn for longer periods.
If you want to learn how to cut down your study time by half, read on.
GMAT Preparation Self Study Workflow
Let me walk you through the GMAT preparation self study workflow. The diagram below shows the workflow:
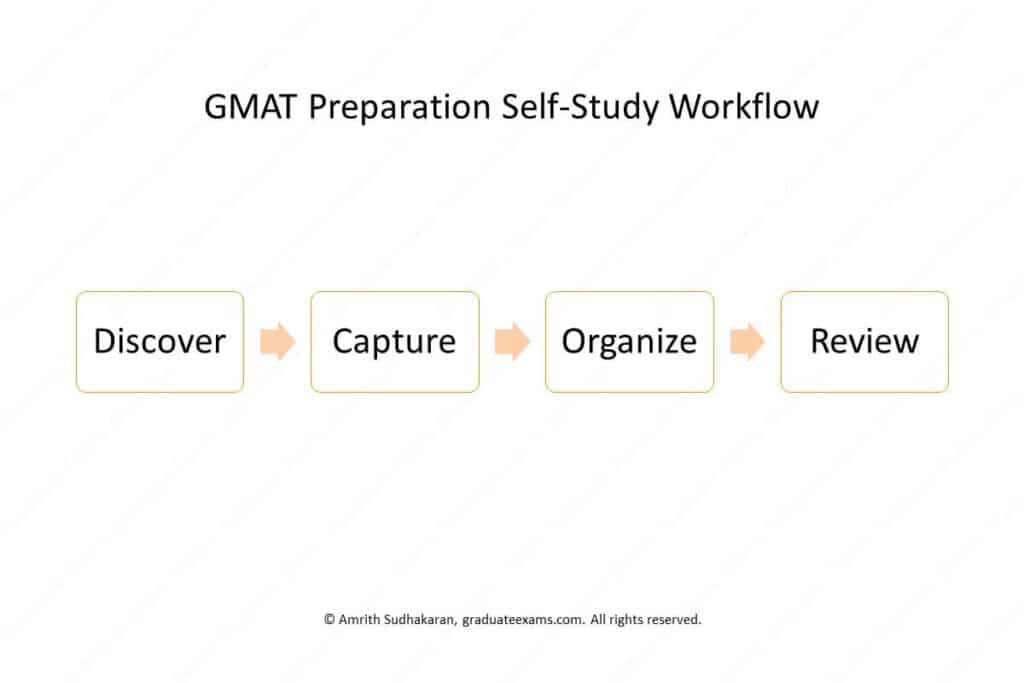
Let’s look at each block of the workflow:
- Capture: The purpose of this step of the block is to transfer new information from your study guide to a personal information retrieval system. In this tutorial, I’ll show you how to create a personal information retrieval system on Anki, a free flashcard app.
- Organize: In this step, you sort the flashcards you create on Anki into decks and subdecks of flashcards.
- Review: After you capture and organize information, you’ll need to review the information to make sure you can remember the information until you’re done with the GMAT. To increase your ability to retain information and recall it, you’ll use two study techniques – active recall and spaced repetition. I’ll cover these two techniques in detail when I get to that part of the article.
Now that you have a 10,000-feet view of the workflow, let’s examine each of these blocks in detail.
Capture New Information from Your Study Guide
On the GMAT, you’ll need to apply information to solve problems so that the GMAT algorithm can evaluate and score your quantitative reasoning ability and verbal reasoning ability.
But during the GMAT, you must rely on only your memory to get the information you need to solve the problem.
Therefore, you must first find the information you’ll need to ace the GMAT and then store that information in your memory.
So, where do you get all the relevant information?
Well, you can look for it online. You’ll find many forums and websites containing information about the quantitative reasoning and the verbal reasoning topics tested on the GMAT.
But, the issue is that the information is spread across many pages or threads. So, the process of finding information this way is time-consuming. However, it’s free. If you have more time than money to spare, I suggest using forums and websites.
But, I do not recommend using free resources. Instead, I suggest you invest in high-quality, GMAT-specific study guides.
I’ve written an article on the best GMAT resources. In that article, you’ll find my review of the best study guide for GMAT preparation.
Once you get your study guide, you can start the process of capturing new information.
What do I mean by new information?
New information is information you’ve either forgotten or you don’t know. While going through your study guide, you’ll find new information in many forms:
- Terms: words specific to a subject, section, or topic.
- Concepts: information that establishes the relationship between terms.
- Formulas: equations in which one side of the equation contains an unknown term and the other side contains known terms.
- Rules: cause-effect relationship connecting one or more terms.
- Methods: step-by-step process to produce a predictable output from a set of inputs.
- Approaches: deliberately choosing a place to start from and proceed.
- Techniques: a specialized way of performing an action to increase speed, efficiency, and/or accuracy.
In traditional methods of study, people highlight new information when they find it. But highlighting new information doesn’t help improve retention and recall. So, instead of highlighting the new information, you must capture the information in a personal information retrieval system.
When I was preparing for the GMAT, I used 3×5 index cards to make physical flashcards. But now, you can use an app like Anki to create digital flashcards.
I recommend using digital flashcards because they are easy to organize and use.
Here’s how you can use Anki to capture new information.
1. Identify new information.
As you read the pages of your study guide, you’ll find new information. For example, here are some new terms I found on a page from my study guide:
- Premise
- Conclusion
- Background Information
- Counterpoint or Counter-Premise
Now that I have found some new information, let me turn them into cues and responses so that I can eventually make flashcards for them.
2. Creat the cue and response for each new information.
A physical flashcard has two sides – front and back. But since both sides are identical, calling the sides front and back doesn’t make sense. Instead, let’s call the sides – cue and response.
- Cue: The side of the flashcard that has a question or the prompt.
- Response: The side of the flashcard that has the answer to the question or the continuation of the prompt.
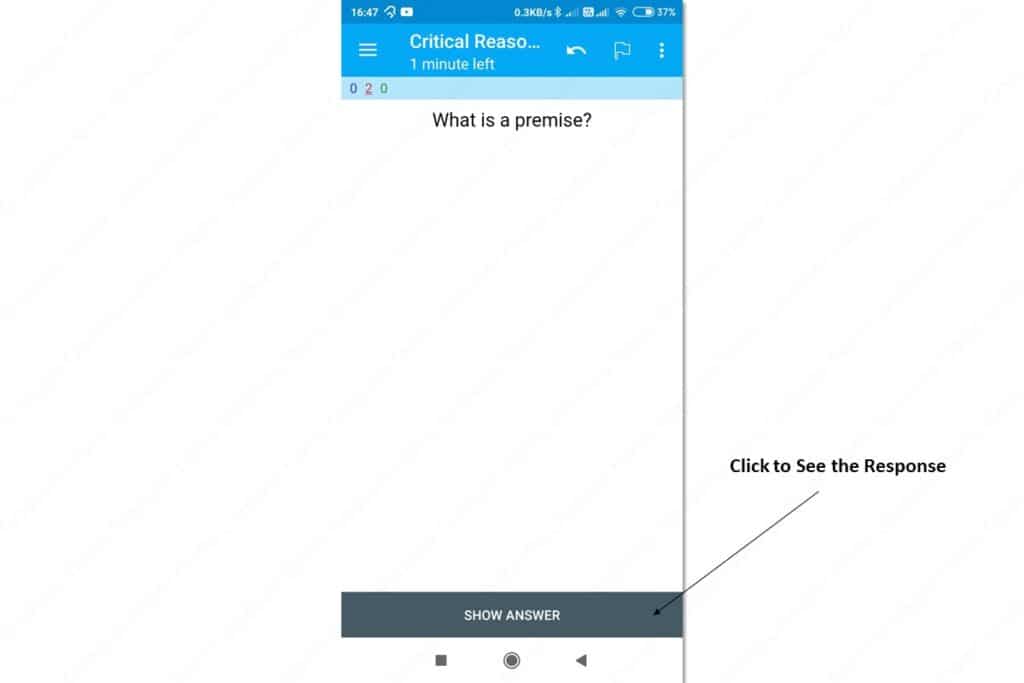
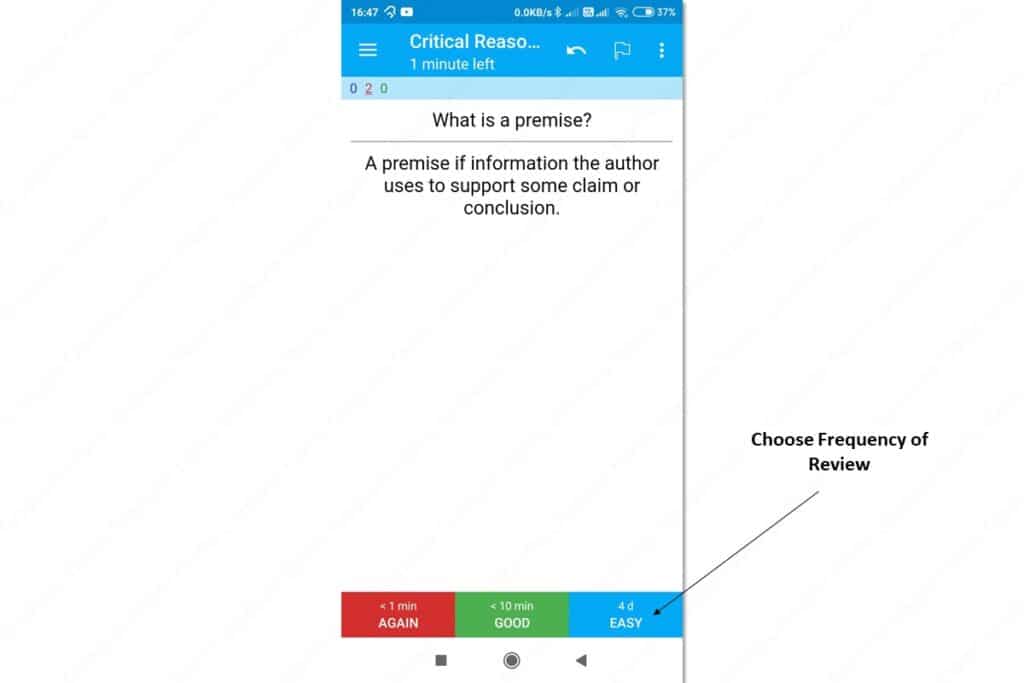
For example, to turn the term “premise” into a flashcard, I should first create a cue. In this case, a good cue would be – “What is a premise?” After creating the cue, I can create the response. The response would be – “A premise is information the author uses to support some claim or conclusion.“
After creating the cue and response for the remaining terms, you can turn them into digital flashcards on Anki. Let’s see how.
3. Turn the cues and responses to digital flashcards.
Anki is a flashcard app that replicates physical flashcards. To see how it’s done, let’s turn the example from the previous section into a flashcard on Anki.
I recommend using the web version because the web version syncs the information with your phone. So, browse to the web version of Anki and signup (it’s free). Here’s the registration link:
https://ankiweb.net/account/register
Once you have an account, log in to your account. Here’s the login link:
https://ankiweb.net/account/login
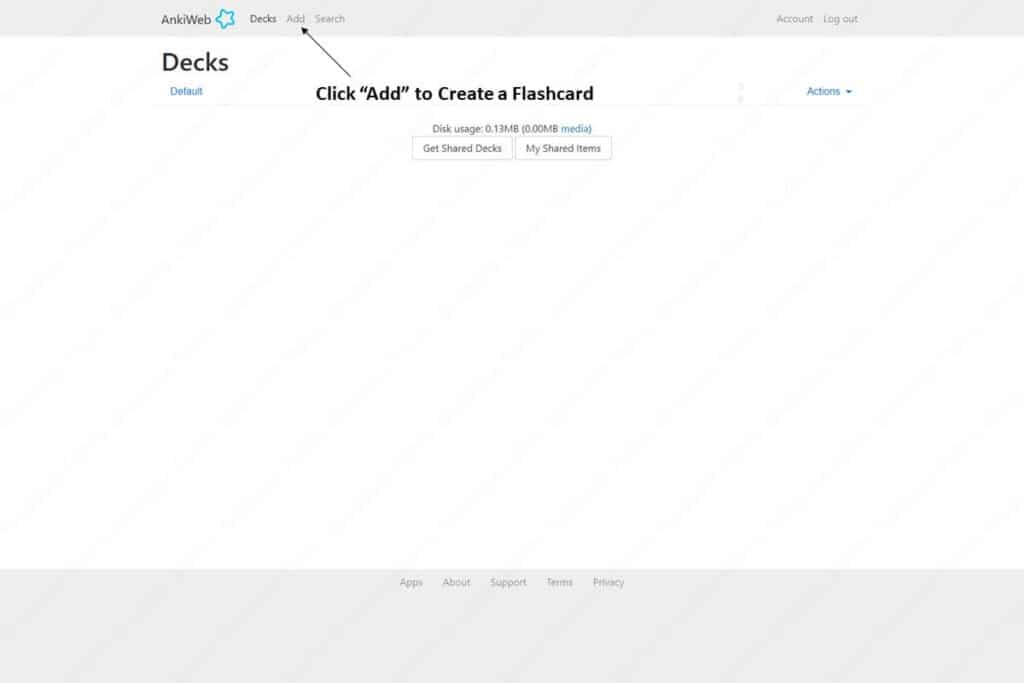
After you log in, you’ll see all your decks.
(But at this point, you don’t have any decks except your default deck. Don’t worry though, you’ll learn all about decks and sub-decks when I show you how to organize your flashcards.)
To create a flashcard, click the link that says, “Add”.
After you click the link, you’ll see a simple form. For now, you can ignore the first two and the last field (I’ve marked them in red).
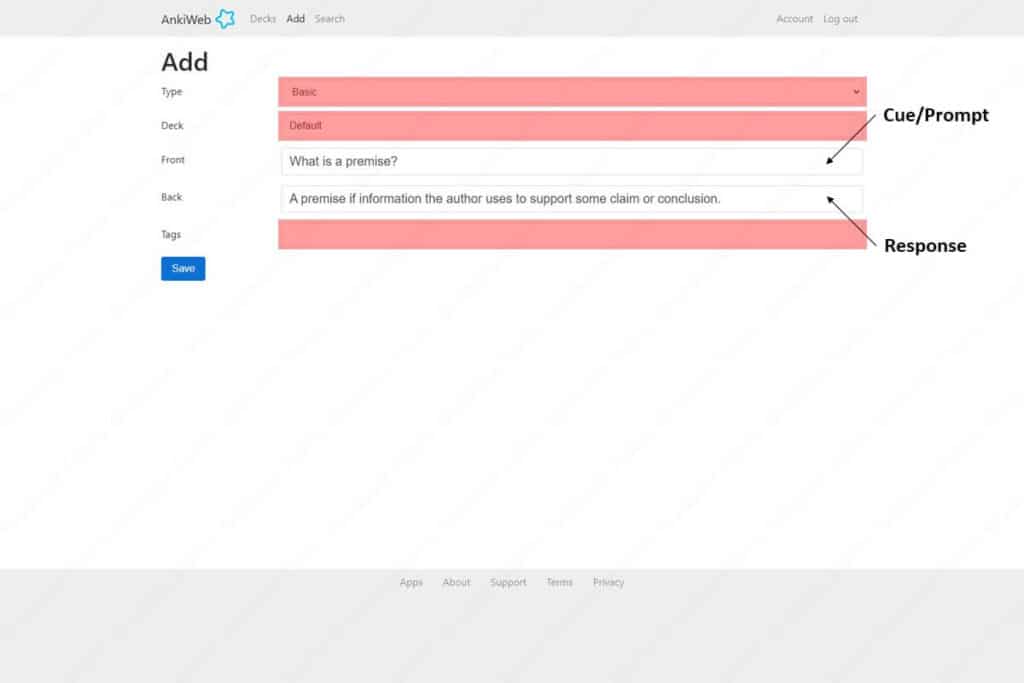
Put the cue or prompt in the field labelled “Front”. And put the response or completion of the prompt in the field labelled “Back”.
Then click the button that says, “Save” to create your flashcard.
Once you click save, the fields will reset, allowing you to create your next flashcard.
For now, instead of creating another flashcard, let’s navigate to our decks. To do that click on the link that says, “Decks”.
Right now, you can see that I have one deck called “Default” and in that deck, I have one flashcard.
If I click on the deck, I can see the cue-side of my flashcard.
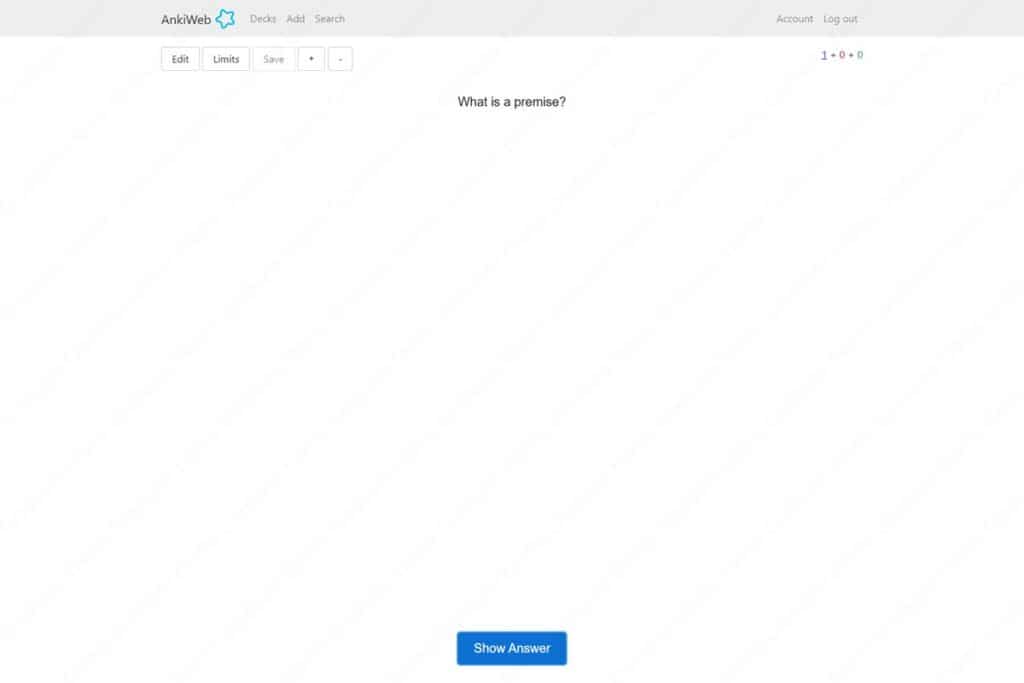
If you click the button that says, “Show Answer”, you’ll see the response-side of the flashcard.

After you click the “Show Answer” button, you’ll see some new buttons at the bottom. I’ll explain what they are briefly.
- Again: Pressing this button tells Anki that you’d like to see the card once every minute of your review session. Click this button for cues for which you have a hard time recalling the response.
- Good: Clicking this button tells Anki that you’d like to see the card once every 10 minutes of your review session. Click this button for cues for which you have a moderate success in recalling the answer.
- Easy: Clicking this button tells Anki that you don’t want to see the card for 4 days. Click this for cues for which you have little to no trouble recalling the answer.
(Since you don’t have enough deck in the cards right now, Anki has no choice but to show you the same card. If you have a lot of cards, Anki will show you the card according to the frequency of repetition of your choice.)
Now that you know how to create flashcards, I’ll show you how to organize them in the next step.
Note About the Anki App and the Web Version
The web version is good for capturing information. But the web version is very limited in its functionality. So, I use the mobile version for organizing and reviewing the decks.
In the next step, I’ll switch to the mobile version. I use an Android phone. So, I don’t know what the interface looks like on iOS. But I’m guessing it’s not too different.
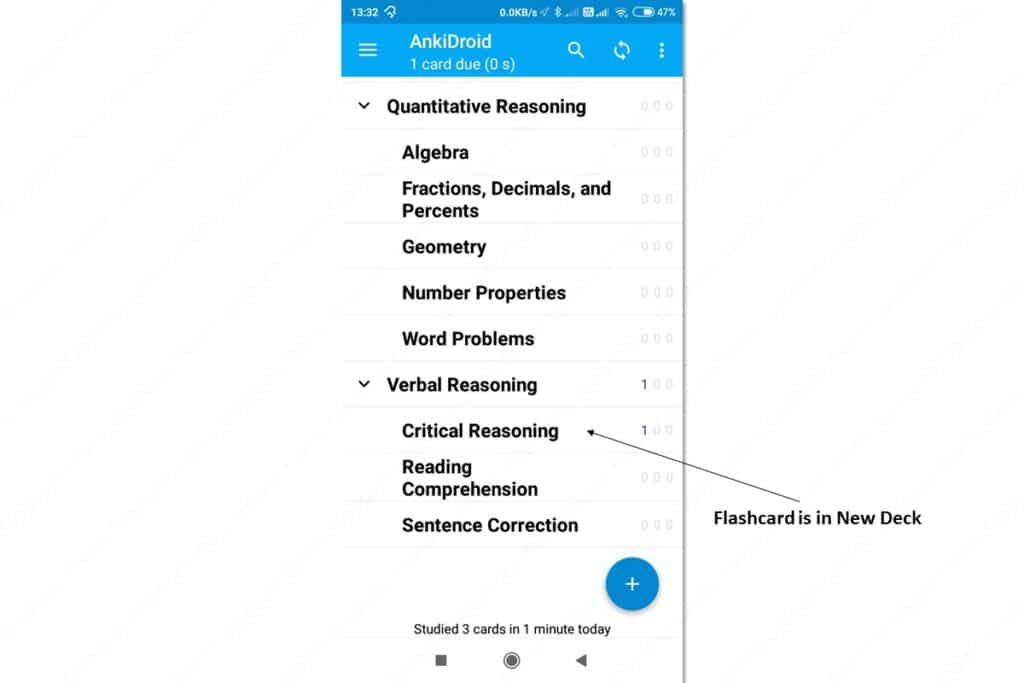
Organize Flashcards into Decks and Subdecks
When helping people create a GMAT preparation self-study plan, I instruct them to divide the process of GMAT preparation into 3 phases:
- the learning phase,
- the practicing phase, and
- the testing phase.
If you want more details about these phases, you can check my article on how to prepare for GMAT from scratch. But for now, you only need to know this:
During the learning phase, you’ll be spending your time discovering, capturing, and organizing new information. During the other two phases, you’ll be reviewing the flashcards you created during the learning phase.
To make the review easy, you should organize your flashcards according to sections on the GMAT.
The sections on the GMAT are as follows:
- Quantitative Reasoning
- Verbal Reasoning
- Analytical Writing Assessment
- Integrated Reasoning
For greater flexibility and control over your review sessions, you can divide these sections into sub-sections. Here are the sub-sections for each section:
- Quantitative Reasoning
- Algebra
- Number Properties
- Fractions, Decimals, and Percents
- Geometry
- Word Problems
- Verbal Reasoning
- Reading Comprehension
- Critical Reasoning
- Sentence Correction
- Analytical Writing Assessment
- Integrated Reasoning
I’ve created the sections and the sub-sections according to the way the Manhattan Prep All the GMAT strategy guide organizes the information. I do this because the Manhattan Prep study guide is the best study guide for GMAT preparation.
However, if you aren’t using the Manhattan Prep strategy guides, you can still use this structure to organize information.
Now that you know what the sections and the sub-sections are, let’s create the corresponding decks and subdecks on Anki.
But, creating new decks is much easier on the mobile app. So, download and install Anki on your mobile.
After you install Anki on your mobile, log in to your account from your mobile.
Once you log in, you’ll see your “Default” deck.
Creating a New Deck
Click the “+” button in the bottom-right corner to access more options.
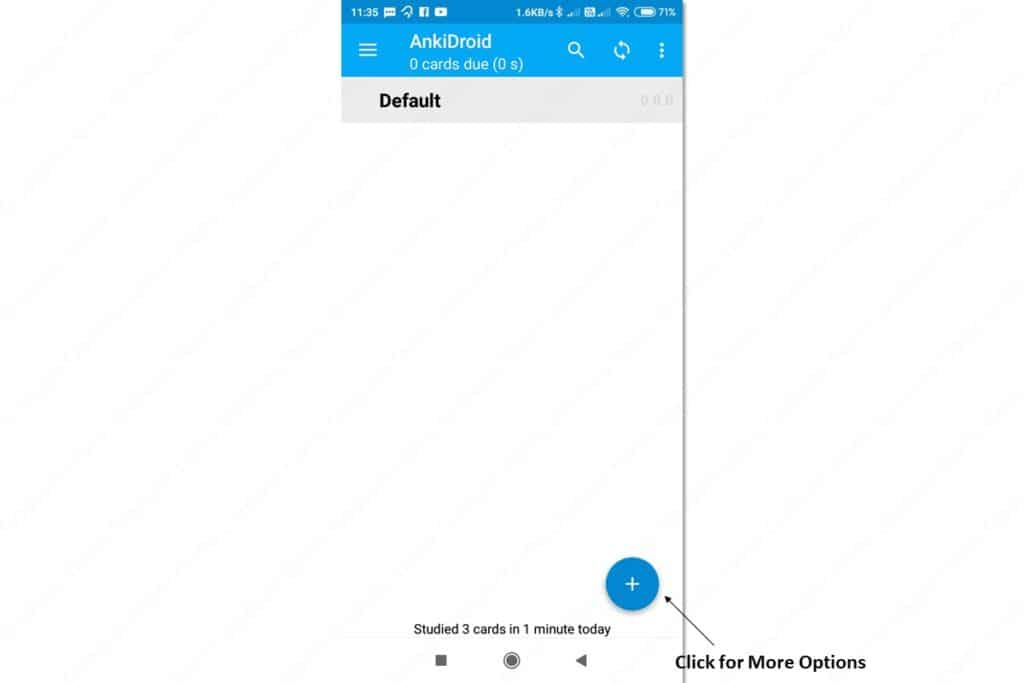
One of the options you’ll see is, “Create deck”. Click on that option.

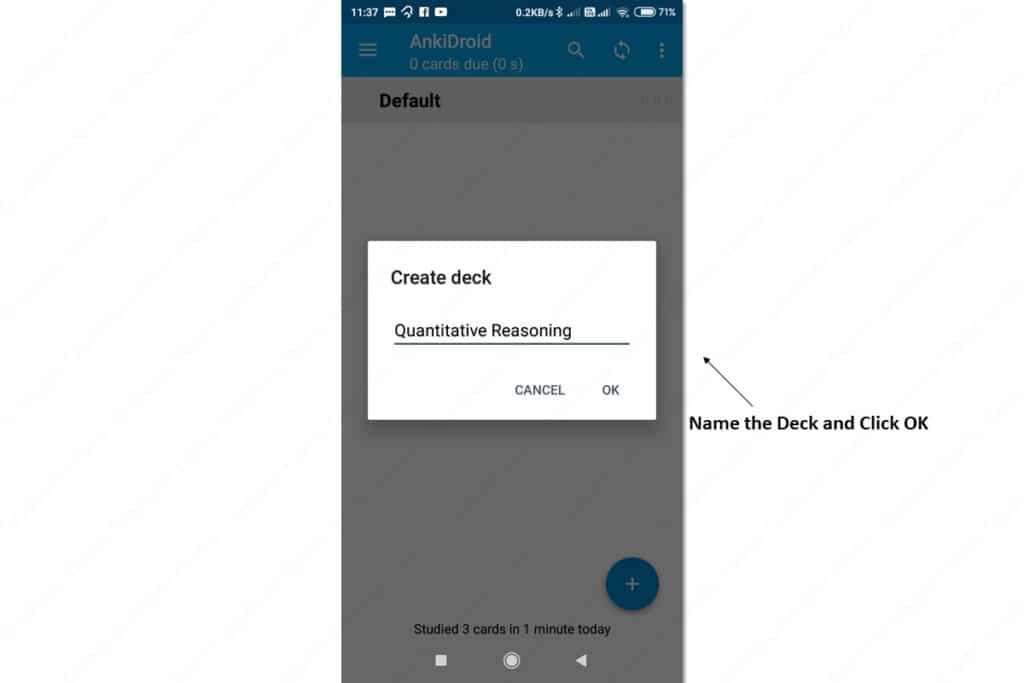
The app will prompt you to write the name of your deck. Let’s call our first deck, “Quantitative Reasoning”.
After writing the name of your new deck, press “OK” to create the deck.
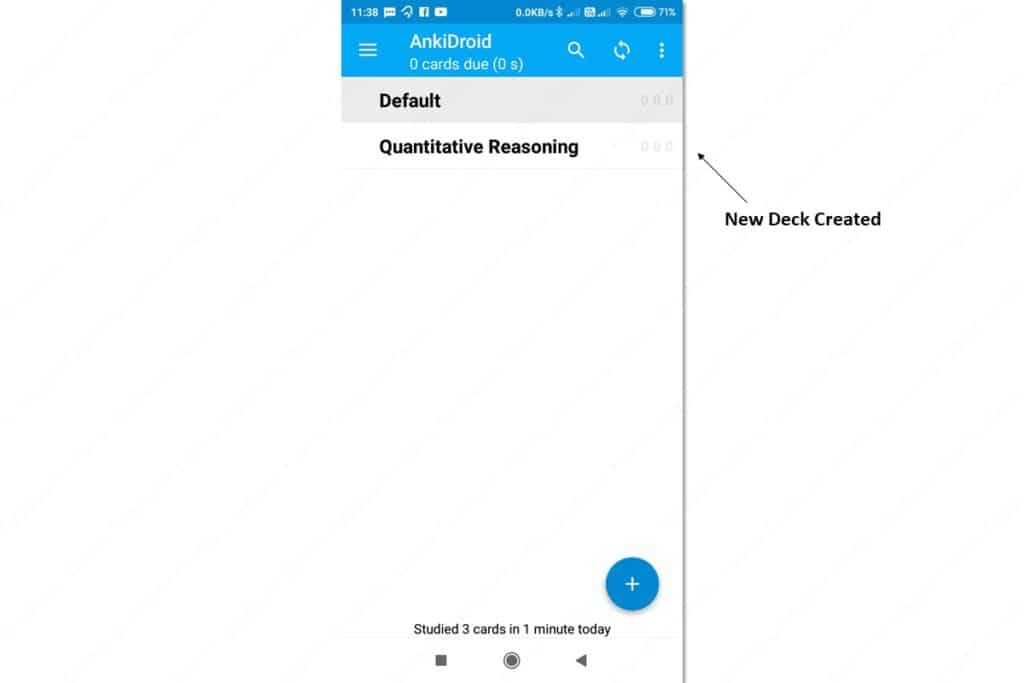
Now, you can see that you have a new deck called “Quantitative Reasoning”.
Creating a New Subdeck
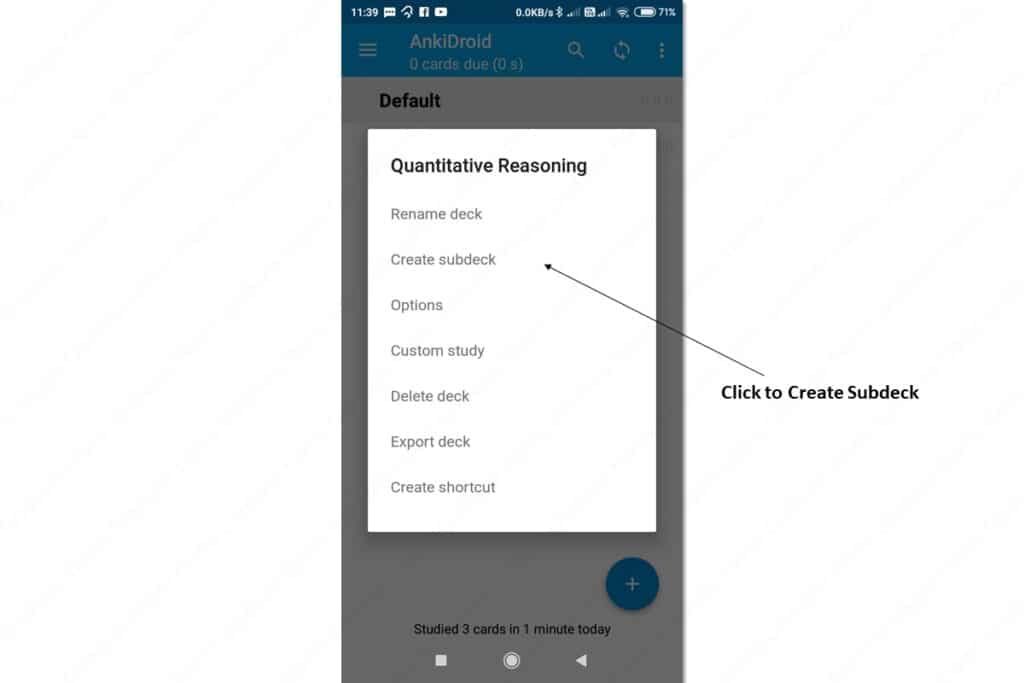
If you long-press the deck, you’ll see some options for the deck. Here are the options:
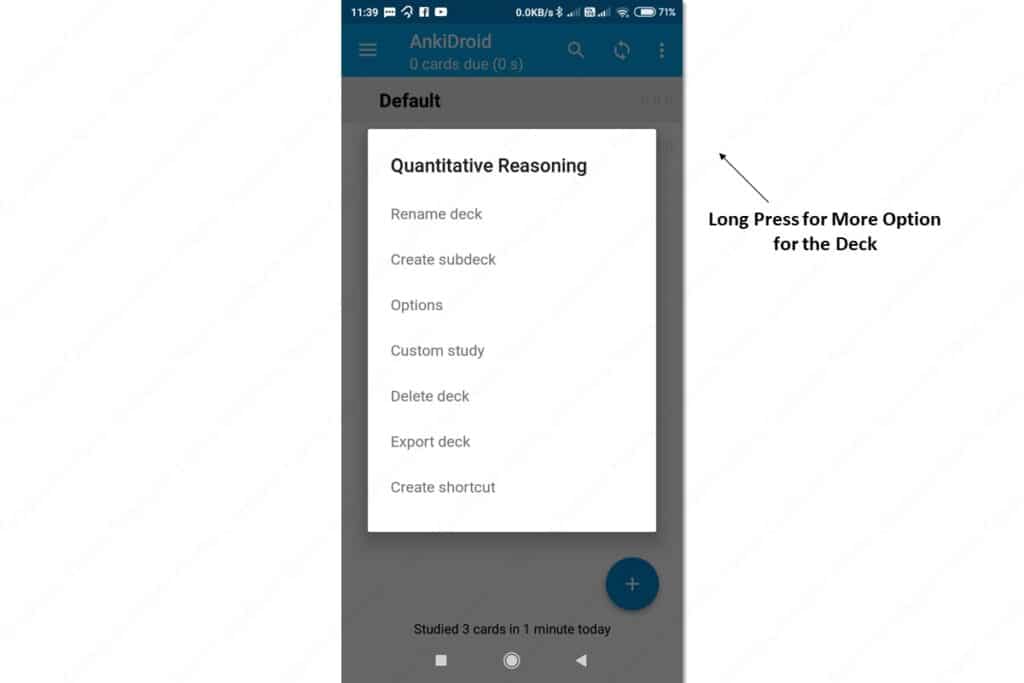
These options allow you to rename, export, or delete the deck. The option also lets you create a subdeck. Let’s click that option to create a subdeck under “Quantitative Reasoning”
Again, Anki will prompt you to name your subdeck. Let’s name our subdeck “Algebra”.
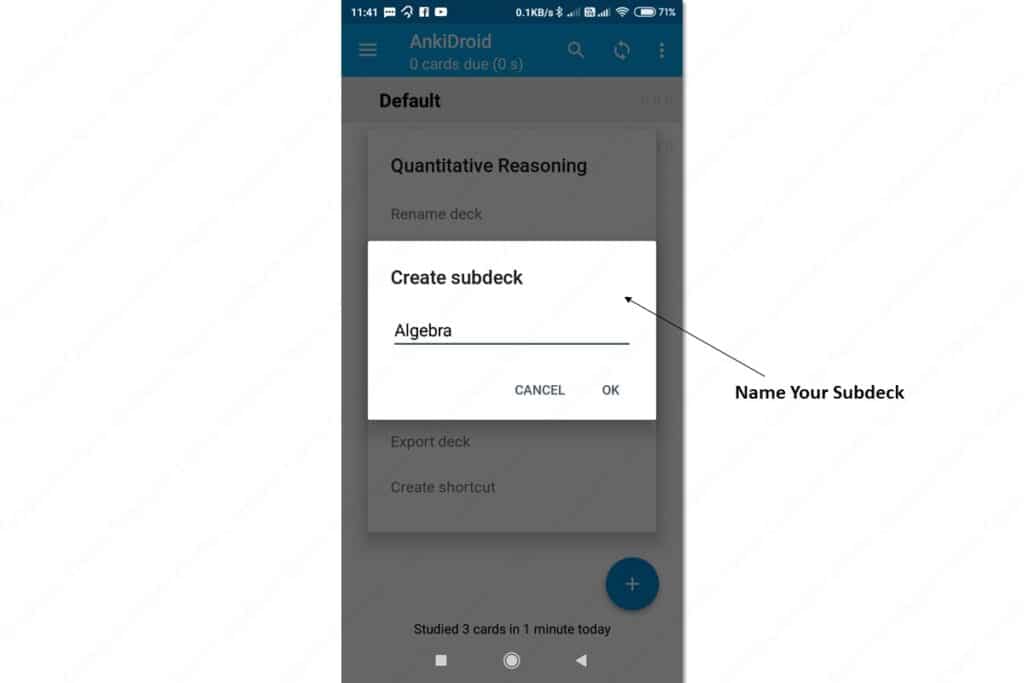
After writing the name of your subdeck, press “OK” to create the subdeck.
As you can see, you’ve created a subdeck called “Algebra” under the deck called “Quantitative Reasoning”.
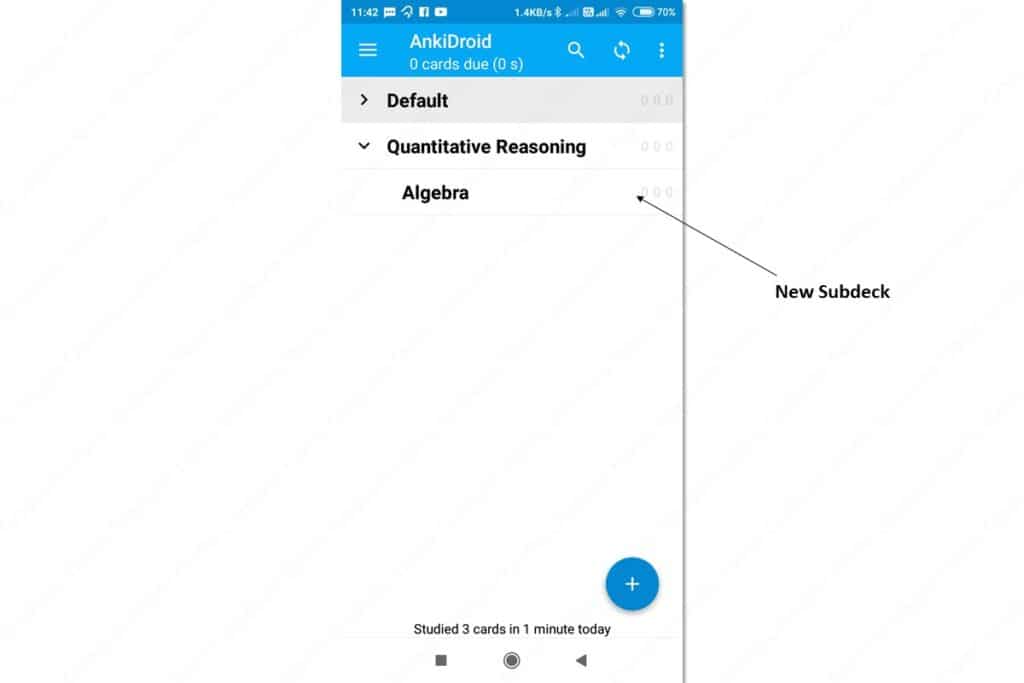
You can follow the same process to create all the other decks and subdecks.
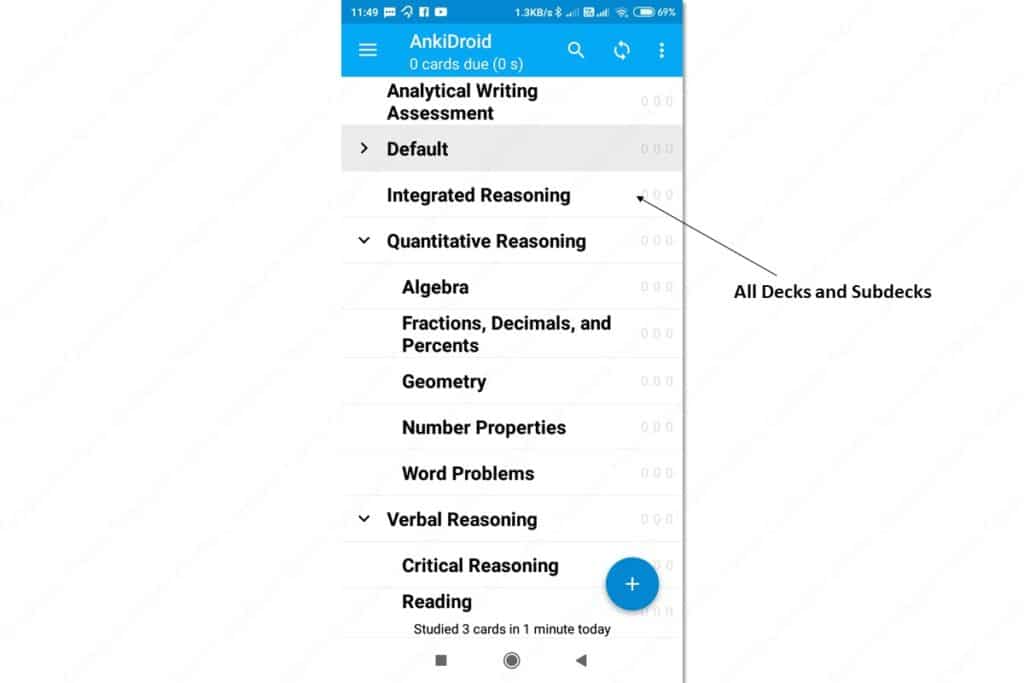
In the end, you should have something looking like this:
Syncing Your Anki Account
The decks you create on your mobile syncs with the web version of Anki. Let’s look at the new decks on the web version.
In case you don’t see the new decks, hit the sync button on the Anki app. It’s on the top right.

Even after hitting the sync button on your mobile, if you don’t see the new decks on the web version, refresh the web page.
Moving a Flashcard to a New Deck
Now that we have our decks, let’s move the flashcard we created from the “Default” deck to the appropriate deck.
To access your flashcard, click the “Default” deck.
Now, click the three dots on the top-right to access more options.
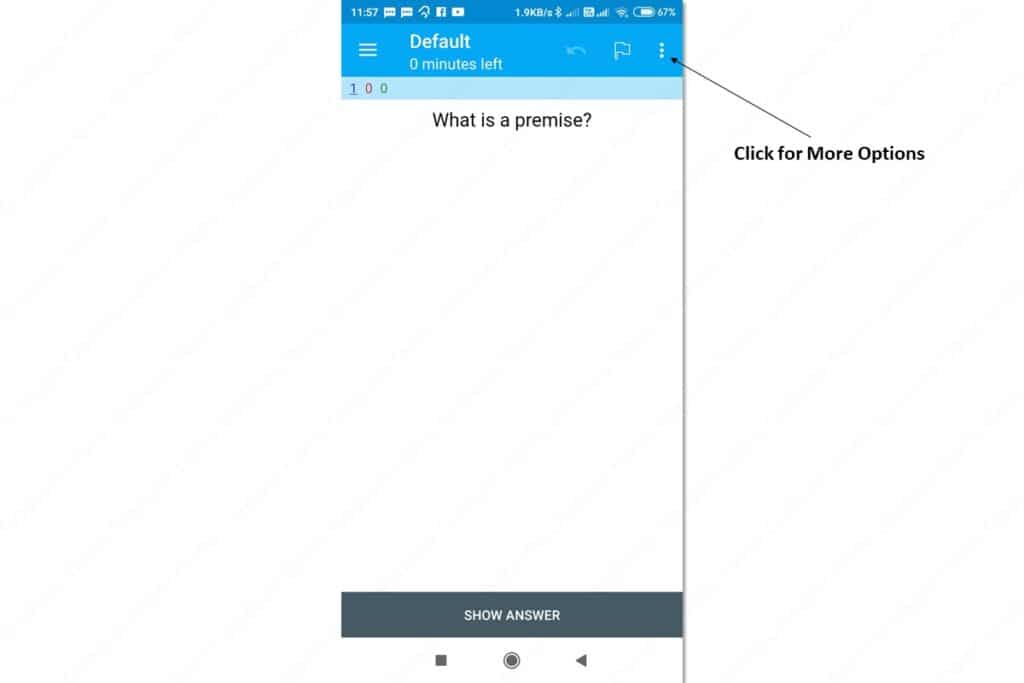
From the options, choose “Edit note”.
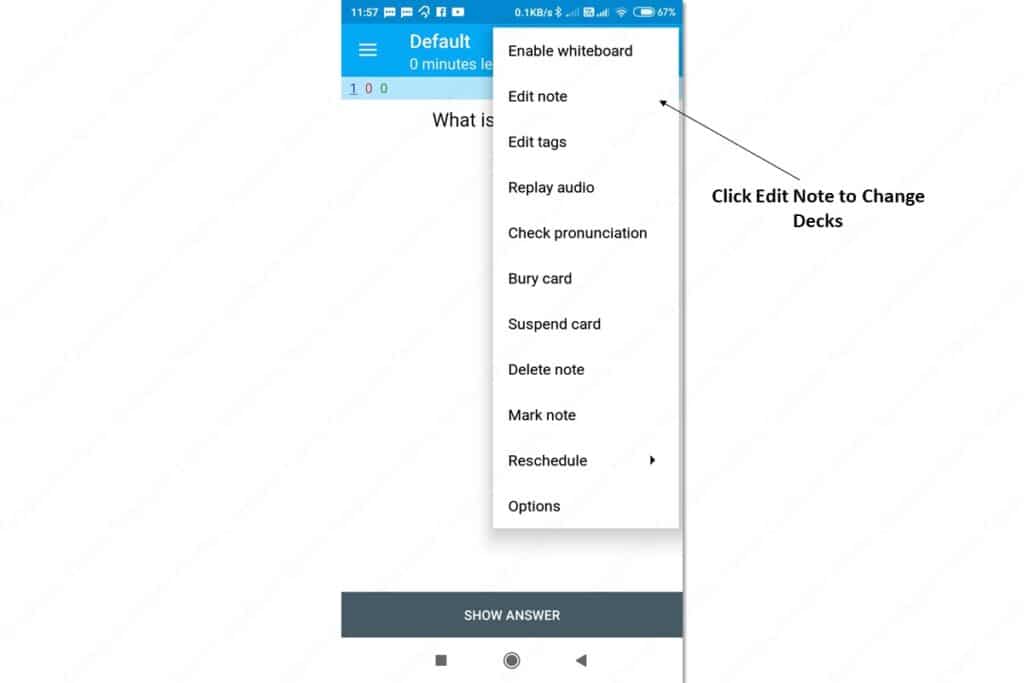
Click the drop-down menu for “Deck” to choose a new deck for your card.

Since this card covers terms relevant to critical reasoning, I’ll choose the “Critical Reasoning” deck.
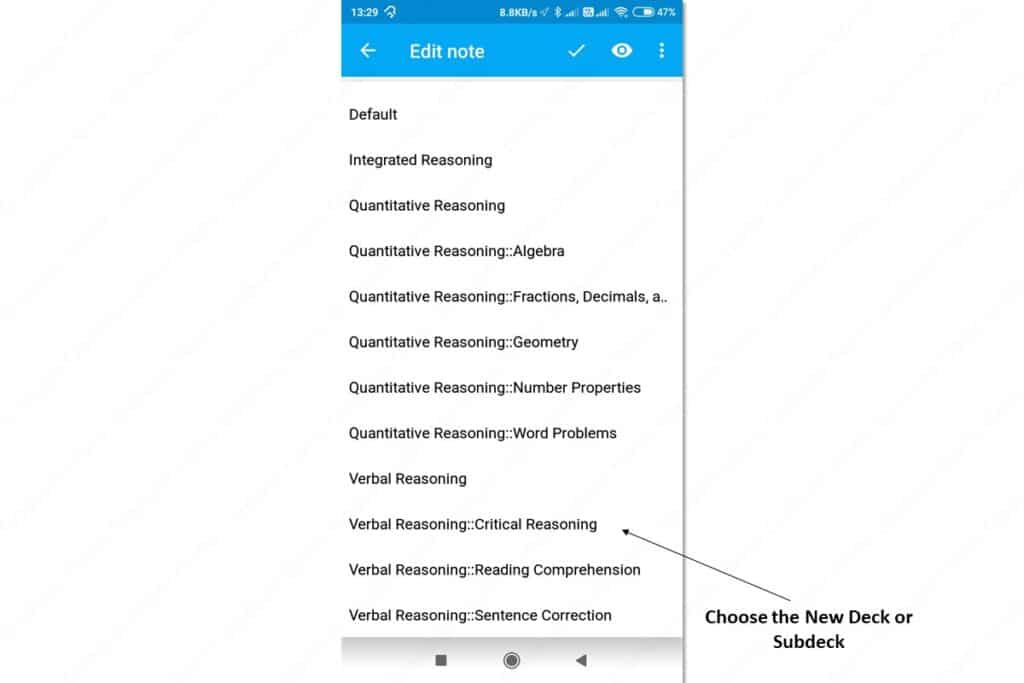
You can see that deck for this flashcard is “Verbal Reasoning::Critical Reasoning.”
(Note: Anki uses double colons to indicate hierarchy.)
Don’t forget to click the tick mark to save the change and go back to your deck of cards.
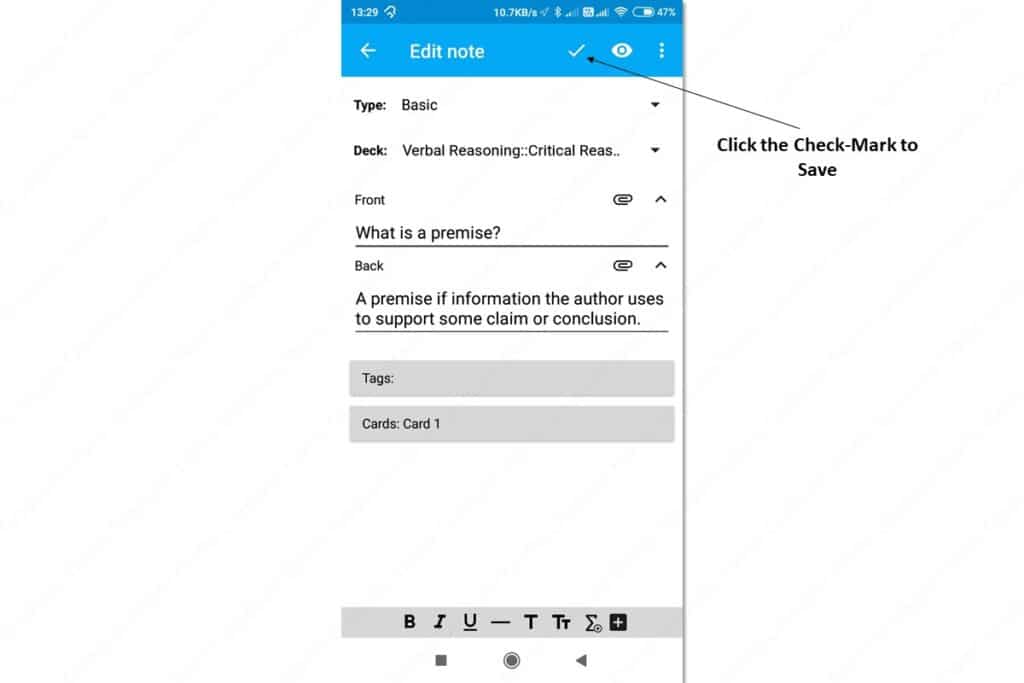
On your deck of cards, you can see that the “Critical Reasoning” subdeck has one card.
Note
Changing a flashcard’s deck is a lot harder than selecting the deck at the time you create the card. So, when you’re creating a new card, I recommend you choose the deck and the subdeck for the card.
If you want to learn more about Anki, you’ll find helpful videos from many YouTube channels.
Do Review Using Active Recall & Spaced Repetition
In the previous steps of the workflow, you discovered, captured, and organized new information. In this step, I’ll show you two proven study techniques to help you internalize the information.
I came across these study techniques on Ali Abdaal’s videos. I highly recommend you look at his channel for more information. But, I’ll give you the short version here.
First, let’s look at what active recall is.
Active Recall
Active recall is the process of retrieving information from your memory. Let’s put your active recall into action.
What did you have for breakfast yesterday?
Whether you could answer the question or not, is not important. I want you to notice that you had to look for this information in your memory, right?
Let’s push your memory a little further.
What did you have for breakfast on the same day last week?
If you answered this correctly, you have a freakishly good memory, a memorable breakfast, or a regular pattern.
If you’re like most people, you probably couldn’t find the information in your memory.
But here’s the thing:
The cloud of forgetfulness can prevent you from recalling information when you’re attempting questions on the GMAT. That would be terrible, wouldn’t it?
So, how do you make information stick? The answer is – repetition.
Spaced Repetition
I know you’ve had trouble remembering a formula or a rule. But I am pretty much certain you have no trouble remembering your name. Why is that?
You have been exposed to your name so many times that you can’t forget your name.
(Unless as a result of trauma or disease.)
So, it’s obvious the more often you expose yourself to something the harder it becomes to forget it.
(Again, strong emotions can embed information firmly in your memory even though you’ve been exposed to it once or a few times. But it’s unlikely you’re going to feel intense emotions during your GMAT preparation. At least I hope so.)
Okay, the “repetition” part of the “spaced repetition” technique is clear. Now, let’s addressed the “space” part.
Imagine dropping a coin and a feather from the top of a building at the same time. Which one do you think would hit the ground first?
Well, the coin would because the coin falls faster than the feather does.
In the same way, you tend to forget some bits of information faster than you tend to forget other bits.
So, you must review the information you forget quickly often. And you must review the information you find easy to retain less frequently. This is what I mean by spaced repetition.
Using Spaced Repetition and Active Recall with Anki
Did you wonder why I asked you to convert information into a cue and a response? I hope you’re starting to see the connection here.
I asked you to create a cue and a response so that you could use active recall. Here’s how that works:
- Open a deck and look at the first flashcard.
- This flashcard shows only the cue and not the response.
- So, use the cue to actively recall the response from your memory.
- If you struggle with it, click the “Show Answer” button to see the response.
- After you read the response, choose how soon you’d like to see this card again.
Anki keeps track of the cards that are due for review. As long as you review your deck of cards on Anki, you’ll be using spaced repetition and active recall.
However, if you don’t create a habit of reviewing your cards, you’ll not benefit from these techniques. So, in the next section, I’ll show you how to create such a habit.
Create a Habit of Reviewing Flashcards
Now that you have a system to discover, capture, organize, and review information, the only part that’s left is putting the system into action.
To put this system into action, build a habit of reviewing the information often.
If you’re someone who struggles with building a habit, Charles Duhigg’s book The Power of Habit and James Clear’s book Atomic Habits are some great books on the subject. If you have the time, I recommend reading or listening to these books. But, if you’re short on time, here’s the relevant bit.
Every habit has three parts – a trigger, a routine, and a reward.
- Trigger: A situation or event that urges you to perform a habituated action. A trigger can be internal states such as a mood, a feeling, or an emotion. Or a trigger can be external sensory events such as smell, sight, sound, taste, or touch. Triggers can also be a mix of external sensory inputs and internal states.
- Routine: A routine is a habituated action.
- Reward: A reward is an increase in how good you feel or a decrease in how bad you feel.
Next, let’s look at a habit from the perspective of these three parts.
When I feel bored, I watch funny videos on YouTube to occupy myself.
- Trigger: Feeling bored – an internal state.
- Routine: Watching funny videos on YouTube.
- Reward: Increase in good feelings because of the funny videos. And decrease bad feelings because of being distracted from boredom.
Now, we’ll use the same structure to create a habit of frequent revision.
First, you pick reliable triggers.
A reliable trigger is something that’s already a habit. For example, waking up, going to sleep, eating your main meals, going to the bathroom, and commuting to work.
Next, set your routine.
In this case, the routine is reviewing flashcards.
In the book Atomic Habits, James Clear recommends breaking the routine into a small action until the habit becomes strong enough to support larger actions.
So, in the first week, your routine would be – “Review flashcards for 5 minutes.”
If you find this easy to do, then in the next week you can modify your routine to this – “Review flashcards for 10 minutes.”
You get the idea.
Finally, set your reward.
The purpose of the reward is not to bribe you into doing the action. The purpose of the reward is to make you feel good.
So, after you perform your routine, do something that makes you feel good.
For example, one of my favourite rewards is building a streak on a habit tracker app.
If you put all the three together, you get something like this:
When I wake up, I review flashcards for 5 minutes. After that, I mark my progress on my habit tracker app to feel good about building my habit streak.
Frequently Asked Question About GMAT Preparation Self Study Approach
Before we move to the study techniques, let’s address some common questions people have about GMAT preparation with just self study.
Is self study enough for GMAT?
There are effective self-study techniques, resources, strategies, and study plans that can help you score 700 or more on the GMAT. On average, you will need to study for 1-2 hours a day for 90 days to get a high score on GMAT if you’re preparing on your own.
How long should you study for the GMAT before taking it?
If you’re on a self-study plan, you will need 90 days to finish your preparation for a 700+ score. During these 90 days, you will have to study for 1-2 hours a day. Also, you’ll need a systematic study plan, a proven strategy, and the right resources to ensure you finish your GMAT prep in time.
How hard is it to get 750 on GMAT?
98% of the people who take the GMAT score less than 750. Furthermore, you’ll need 120-180 hours of intensive preparation to score 750 or more on the GMAT. Given the length of the preparation time and the low probability of success, scoring 750+ on the GMAT is hard.
Can I take the GMAT without studying?
Yes, you can take the GMAT without studying. However, a GMAC survey found that people who took the GMAT with less than 45 hours reported a median GMAT score of less than 500. A GMAT score of 500 is far below the average GMAT score expected in the top 100 business schools.
Conclusion
Everything I am sharing with you in this article has been tested and refined by my own experience as well as the experience of others whom I have helped.
These strategies helped me improve my GMAT score from 650 to 710 and then from 710 to 750. So, I am confident these GMAT preparation self study techniques can help you get a 700+ score.
But if you need some help with your preparation, you can get in touch with me via email. I usually respond the same day or the day after.
Here’s my email address:
ask@graduateexams.com
I wish you all the best in your GMAT preparation. Take care.